With regards to metal 3D printing, are you promising yourself record-breaking production times from the idea to the finished component? So that you can attain your own best time and reach your goal in a timely manner, you should also realistically include calculations regarding the post-processing of your components from the very outset. You can find out here what precisely occurs during the post-processing and what options you have for the perfect 3D print finishing.
3D Print Post-Treatment – What is That Actually?
From the printer directly into the application – unfortunately, it isn’t quite so simple. Before the component is ready for its designated location, there are still at least two intermediate steps missing:
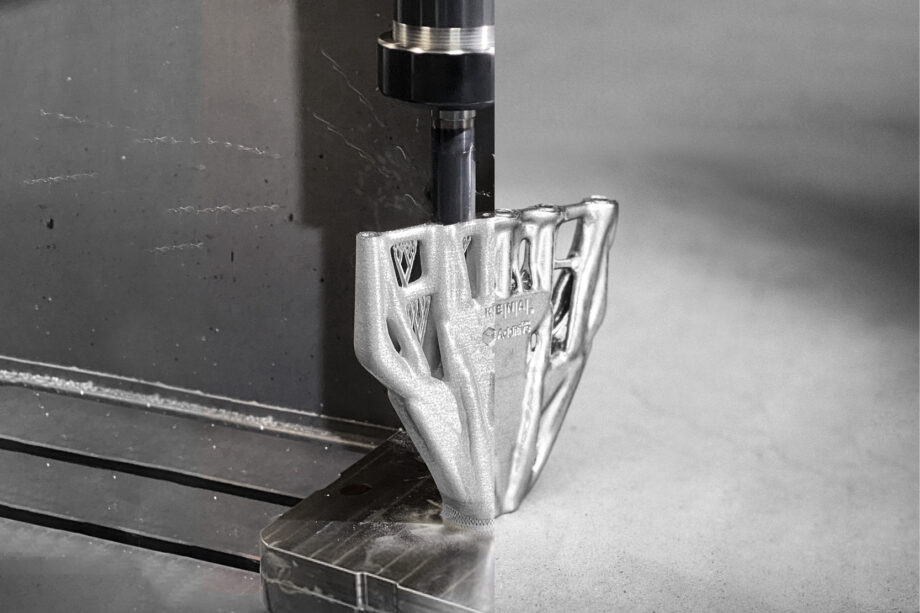
Step 1: Removal of the Support Structures
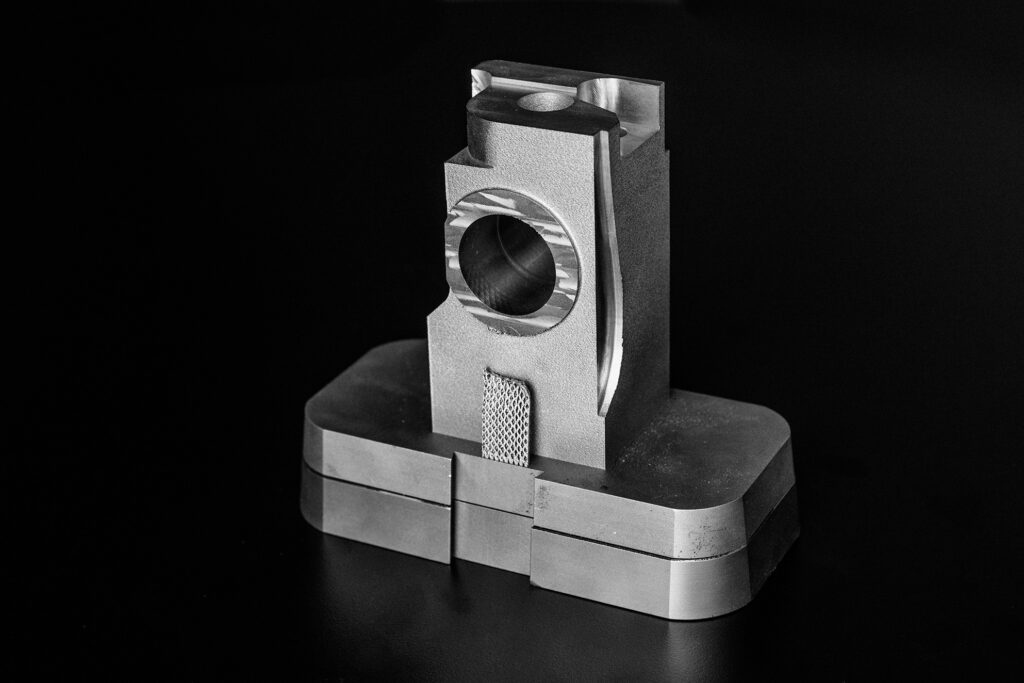
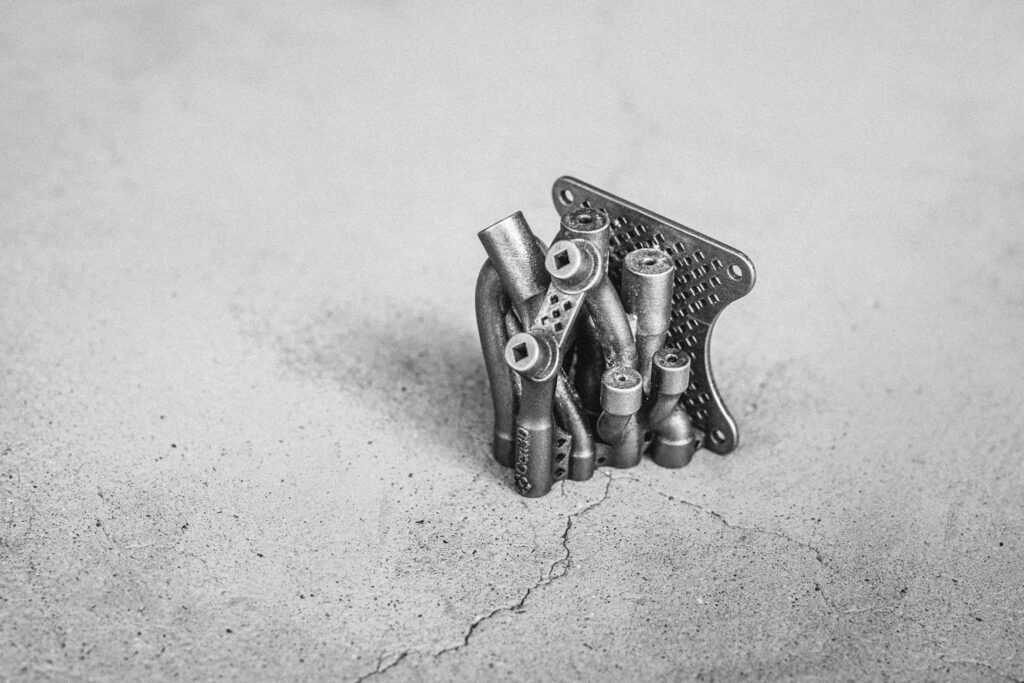
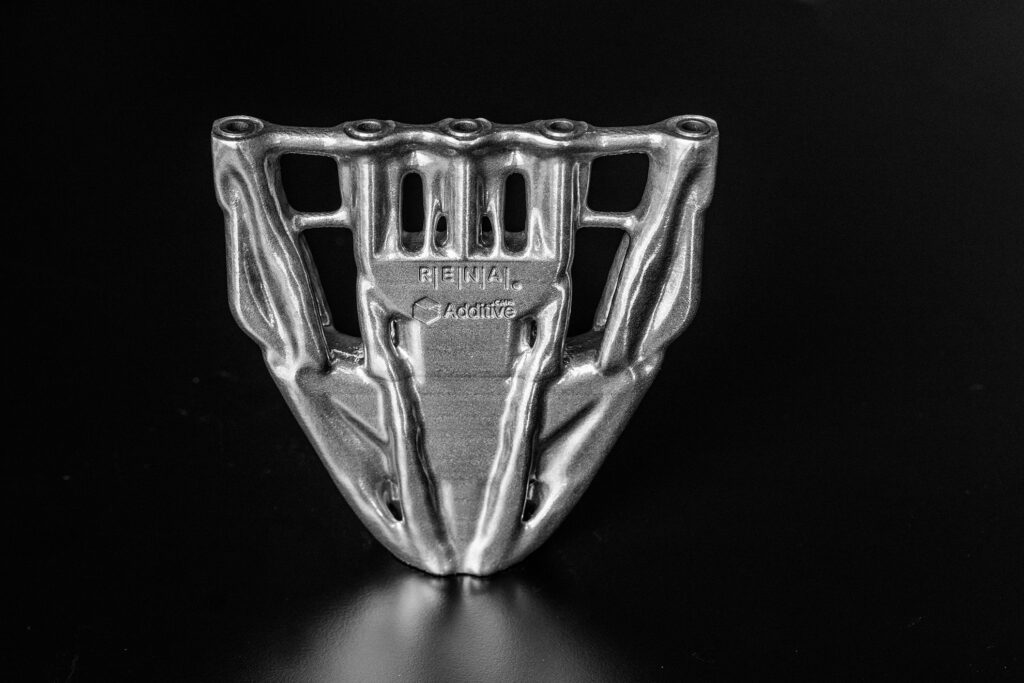
Directly after the printing has been done, the component has optically little in common with the target state. In its narrow brace of support structures, it is barely recognizable. From stable pins to the foam-like mesh, these structures can have many faces. They all have the following in common: Before one can proceed, they have to go.
Step 2: Optimization and Smoothing of Coarse Surfaces in 3D Printing
After the 3D printing, your component still has a coarse surface? Depending upon the layer structure, this can be quite normal during 3D printing. By utilizing the correct post-processing, you will obtain precisely the surface which you require for using your component.
Optional: Finishing
If all support structures have been eliminated and the surface is smooth, one may proceed. Depending upon the planned application of the component, it is now ready for finishing such as corrosion protection layers, colored varnishing or engravings.
These Processes are Suitable for the Post-Processing of Metal 3D Prints
There are multiple processes for the post-processing of your components. You can find out now what they are and for what they are suitable:
Mechanical Post-Processing
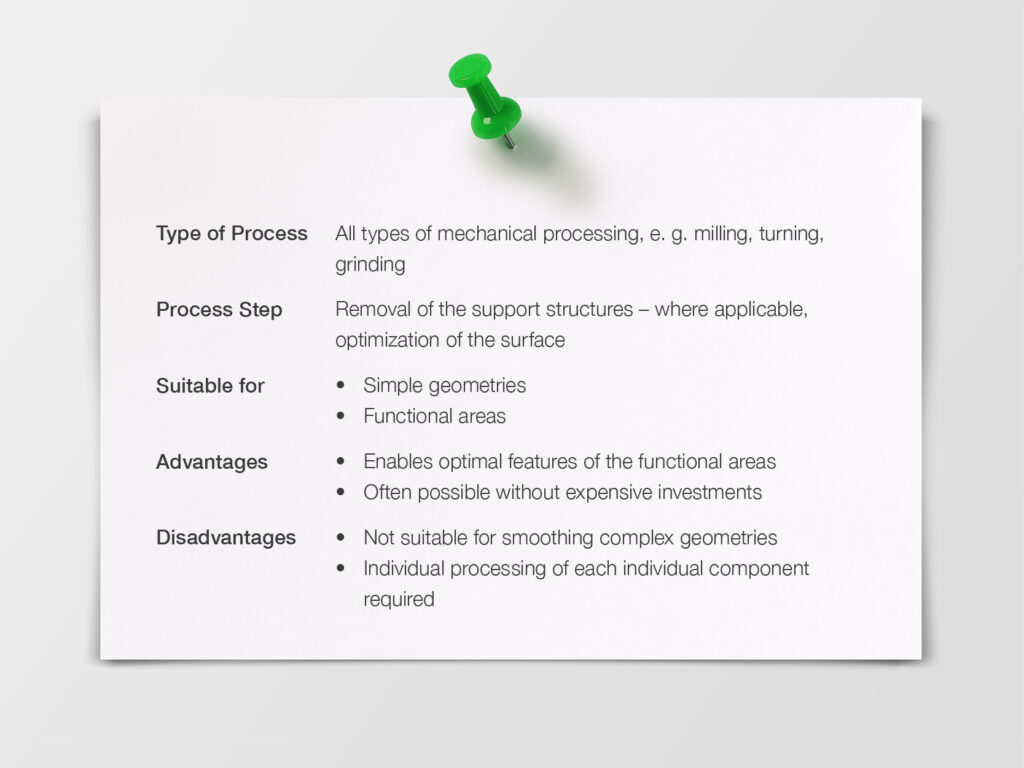
As a rule, the mechanical post-processing encompasses subtractive processes such as milling, grinding or turning. During the post-processing, for example, support geometries can be removed or contact and functional areas can be prepared for their subsequent deployment.
Depending upon the process, tools for this are satisfactory which are available for the customary utilization during production. However, these processes reach their limits for complex geometries or even internal structures. An exact post-processing is hardly possible for such components.
Generally, mechanical post-processing steps are combined with additional processes.
Shot Blasting the 3D Prints
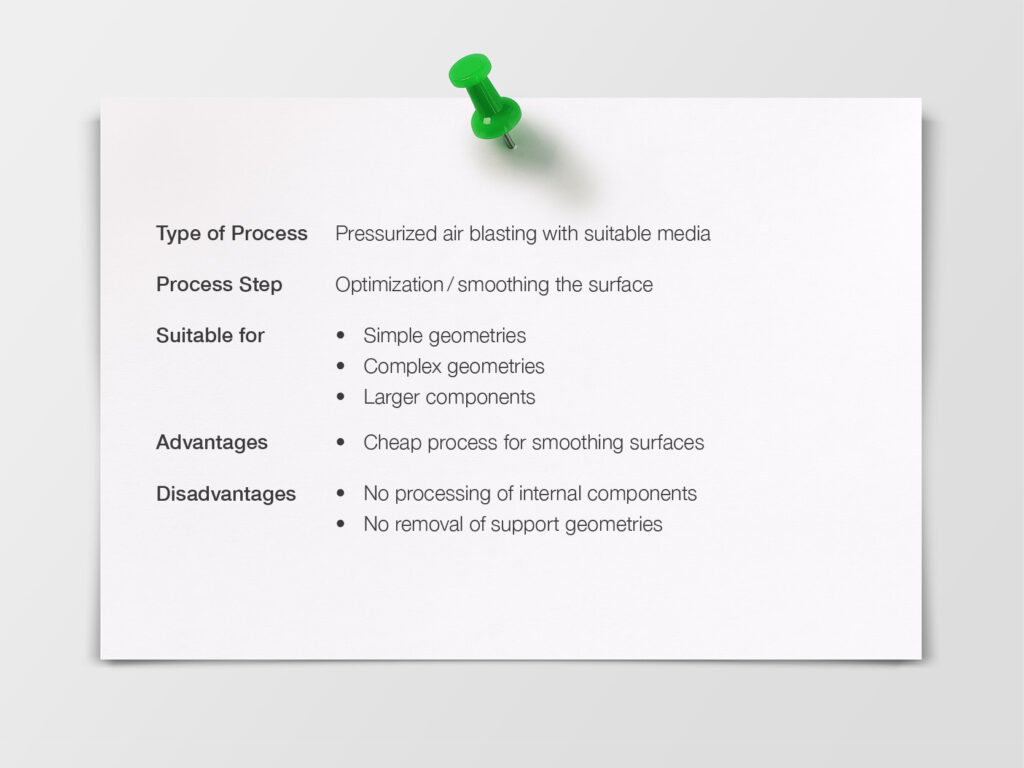
The shot blasting of the 3D prints is considered to be a cheap superficial treatment. The small components of the additive hit the component with pressurized air and thus have an impact on the surface. Any irregularities disappear as well as any discolorations. The existing support structures must be removed for this in advance.
The process reaches its limits for particularly complex components with internal areas.
Barrel and/or Vibratory Finishing of the 3D Prints

The barrel finishing – often also done after 3D printing – enables the post-processing of multiple components at the same time. As a rule, it encompasses smaller components with simple geometries. For this, all components are simultaneously subjected to vibration in a basin filled with an abrasive. Due to the vibration, friction is created which gradually removes the irregularities of the components. In so doing, even the remnants of the support structures are also smoothed. Therefore, the prerequisite is to remove the structures in advance.
Hirtisation®
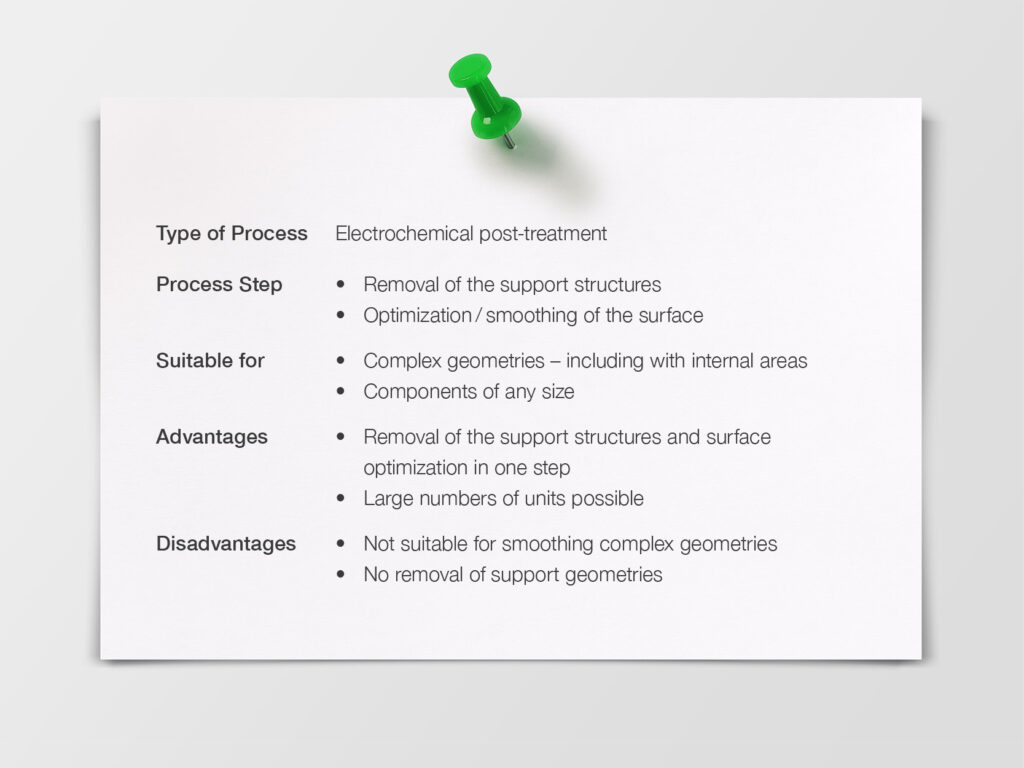
Hirtisation® encompasses a patented solution from RENA Technologies GmbH. The process simultaneously combines both process steps with each other: It removes support structures and smooths the surface – and this is done completely in automated fashion.
For this, all parts are simultaneously treated electrochemically in special machines. While the substance of the component remains intact down to a razor-thin layer, the support geometries are broken down during the process. So that this is successful cleanly and without any remnants, an adjustment of the support structures before the printing is required.
Even the coarseness of the surface disappears reliably during Hirtisation®.
In this context, the wet chemical cleaning agents penetrate each compartment of the component so that even internal areas are thoroughly treated. After a final cleaning, all parts are ready for their practical deployment.
Due to the high investment costs for the purchasing of the equipment, this process is suitable above all for large numbers of units.
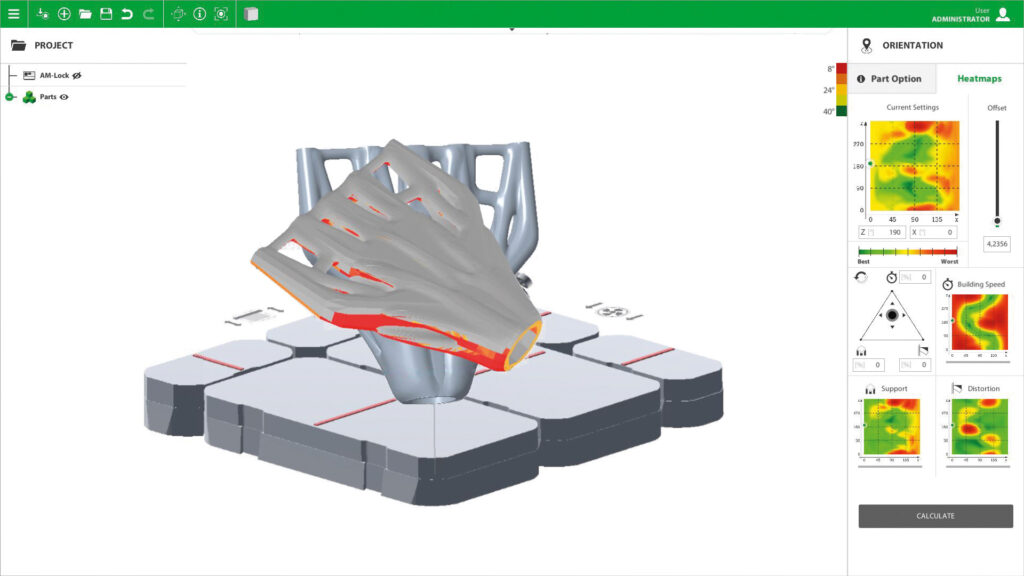
The Role of Data Preparation for the Post-Treatment
Even the correct preparation of the data before printing offers much potential for preventatively optimizing the surface of a component. During the metal 3D printing during the SLM process, particularly perfectly-adapted laser intensities and its focal points make the difference. Optimally-calculated starting and end points not only ensure more stability, but rather also that there will be fewer irregularities. The same applies for the angle in which the component is created upon the basis.
Planning Already During the Data Preparation
You should already define the type of post-preparation after the printing during the data preparation, because, with the right software, the input from the post-treatment will have a direct effect upon the printing. With AM-Studio, for example, components that are subsequently hirtisated will be adjusted in their support geometry and their support thickness.
Bottom Line: What Process is Suitable for Your Post-Processing?
Which of the processes is therefore the best for your application? As with many aspects of your manufacturing, the following also applies here: It depends. In addition to the requirements which your component must subsequently fulfil, above all the investment costs are also an important indicator for your decision. But also your existing conditions are important. Finally, your printer and your data preparation software must also be suitable for the post-processing.